Ground Up Windows Install
Info
This guide is intended for advanced users who want to configure EQEmu "from the ground up" for a windows server. It is not the recommended route, we suggest using the Windows-Server install instead for most cases
This guide provides instructions for compiling 64-bit Windows server binaries and setting up a local development server
Read through this guide before starting to ensure an understanding of the process
Info
The target computer must have an active internet connection at the time of installation.
Please direct any questions to our server support channel in [discord]
Screenshots may vary depending on options selected and program graphical user interface changes.
Compiler Setup
The current C/C++ support standard of the EQEmulator server code base mandates the use of Visual Studio 2017 or later compilers.
Visual Studio 2017 is the current EQEmulator standard for binary compilation. Please ensure that your system meets the [Visual Studio 2017 Minimum System Requirements].
Visual Studio 2019 may also be used..though, less is known about the stability of this platform with the EQEmulator code base.
This setup assumes an install on a 64-bit Windows operating system with 64-bit target binaries.
Verify System Environment Variable %Path% Length
Sometimes an automated server installation will fail due to the %Path% variable being full. This can happen with a manual installation as well.
Since this guide installs more programs than are required for server operation alone, verifying the length of %Path% is critical before we start
Finding Your Current Path
- Click on your
Startbutton - Type "environment variable" into your
Search programs and filestext box - Click on
Edit system environment variables - Click the
Environment Variablesbutton on the window that pops up - Ensure the variable
Pathis selected in the system variables section (bottom text box) - Click the
Editbutton
You may check the length of your %Path% variable by copying the Variable value contents and pasting them into a text editor that supports "selection" count.
Registry values are only allocated 1024 bytes of storage. However, environmental variables may contain up to 2048 bytes through the use of an alias.
If your selection count is greater than 768 characters, you may need to setup an alias to prevent corruption of the %Path% variable.
Required Programs
Some of the pre-requisites for compiling binaries are the same as running a server.
If you have already installed any of the following, the download and installation requirement should be omitted:
-
Visual Studio 2017 Community Edition [select Visual Studio 2017 Community Edition]
Note: Microsoft now requires a user account to download Visual Studio. Clicking the Visual Studio link above will take you to the "older versions" page. Clicking the
Downloadbutton on that page will prompt you to log in or create an account. -
Visual Studio 2022 Community Edition [alternative download]
Note: Only install one version of Visual Studio
-
Perl v5.24.4.1 (64-bit) [download]
- CMake (64-bit) [download]
- Git (64-bit) [download]
-
TortoiseGit (64-bit - Optional) [download]
Note: TortoiseGit is a menu-driven, add-on gui interface for Git. Though optional, this instructional provides for its use.
Some programs may be able to use newer versions, or even their latest releases, without issue. But, this is not the case with Perl and (later) dependencies.
The above list of programs is known to work for compiling working server binaries.
Install Visual Studio
During the install process, ensure the option for Desktop development with C++ is checked.
Info
This package is required by Visual Studio to compile c/c++ code and by CMake to determine available compiler options. It will also cause CMake file generation to fail, if not enabled
If you selected Visual Studio 2017 Community Edition, you will need to update to the most current version.
Info
This requirement is not needed for Visual Studio 2019 installations..but, it is a good idea to have the most up-to-date compiler features
Install Perl
This installation is self-explanatory.
Note: It is recommended that you install in the root folder (`c:) to avoid possible issues.
Install CMake
This installation is self-explanatory.
Install Git
This installation is self-explanatory.
Install TortoiseGit
This installation is self-explanatory.
Restart Computer
You will need to restart your computer to ensure that all of the %Path% additions are loaded into memory.
Acquiring the Code
At this point, you will need to make a decision on how you want to manage your code.
There are two options:
- Create a local repository from the parent EQEmulator project that can be updated, managed and maintained (recommended)
-
Create a local repository from a fork of the EQEmulator project that you manage (optional - select only if you want to contribute back to the parent project)
Note: If you choose to create a fork of the EQEmulator repository, you will need to create a _[github.com] _account.
If you chose option 1, create a sub-folder called git-eqemulator in the root folder of c: drive.
If you chose option 2, create a sub-folder called git-<git-username> in the root folder of c: drive. (example: git username is Pavlov, folder name would be git-pavlov)
The purpose of this folder is to facilitate code management. We'll refer to this as the accountfolder..
Go to the EQEmulator server code repository web page at https://github.com/EQEmu/Server..
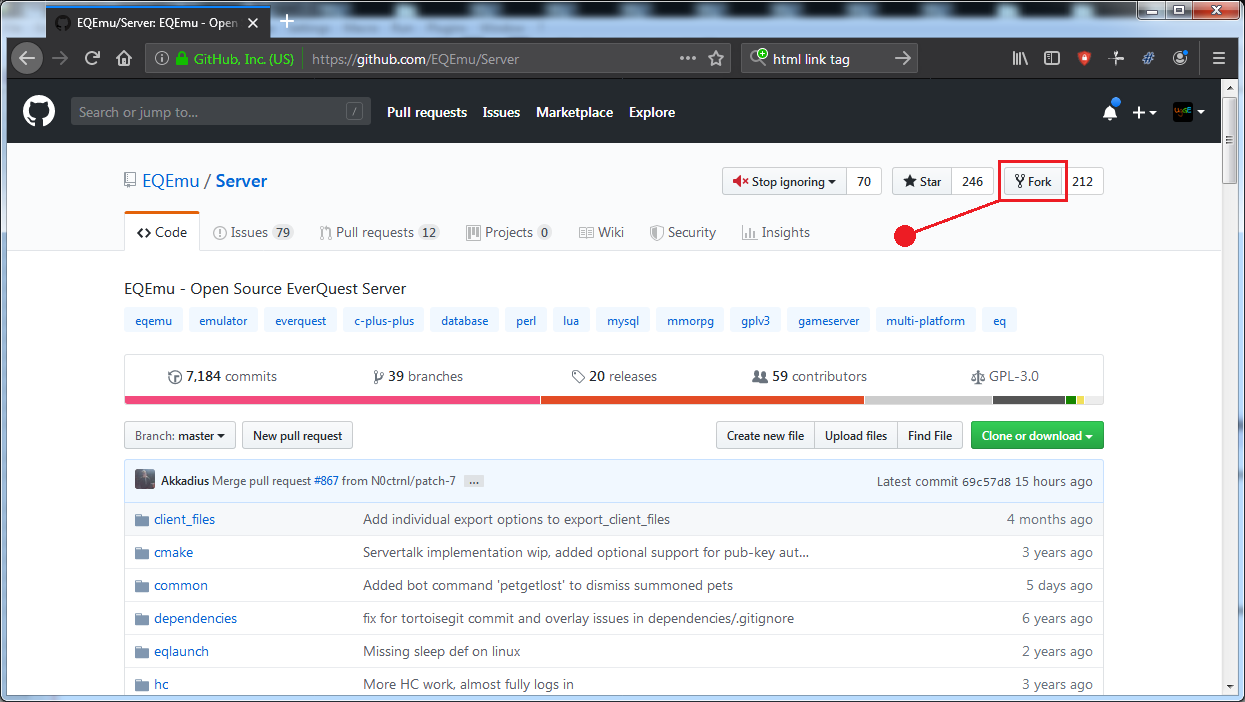
If you chose option 2 and are creating a fork, click on the fork button to add the repository to your github account. You should be redirected to your fork's main repository page.
Finally, click the Clone or download button, then Open in Desktop button to create a local code repository on your computer. Select TortoiseGit for the program to use. When prompted for where to create it, select the account folder created above.
You should now have a managed local code repository on your computer.
Note: It is helpful to create a shortcut to the account folder and place it on your desktop..
Install Submodules
To install the required submodules:
- Open your server folder in a Git CLI of your choice.
- Run
git submodule init. - Run
git submodule update.
Submodules are now installed.
Installing Dependencies/VCPkg
To install the required dependencies and VCPkg, simply run CMake and they will be automatically installed.
Running CMake
CMake's default options are adequate to configure and generate the files needed for Visual Studio.
There are two folder locations that you will need to provide:
Where is the source code:Where to build the binaries:
For the source code, type-in or navigate to your c:/<account>/Server folder.
The easiest way to define the build folder is to copy the source path and paste it in. Then, add /build to the end of the path so that you have c:/<account>/Server/build.
Once CMake knows where to look, click the Configure button. You will get a pop-up window stating that the build folder does not exist. Click OK to create it.
The next window will be for compiler selection. Ensure that the version of Visual Studio that you installed is selected (Visual Studio 15 2017 or Visual Studio 16 2019). Leave the Use default native compilers option as-is. If you are using a newer version of CMake that has the Optional platform for generator drop-down box, ensure that x64 is selected. Finally, click Finish to proceed.
Note: CMake will download the appropriate vcpkg and install its contents. User intervention is no longer required.
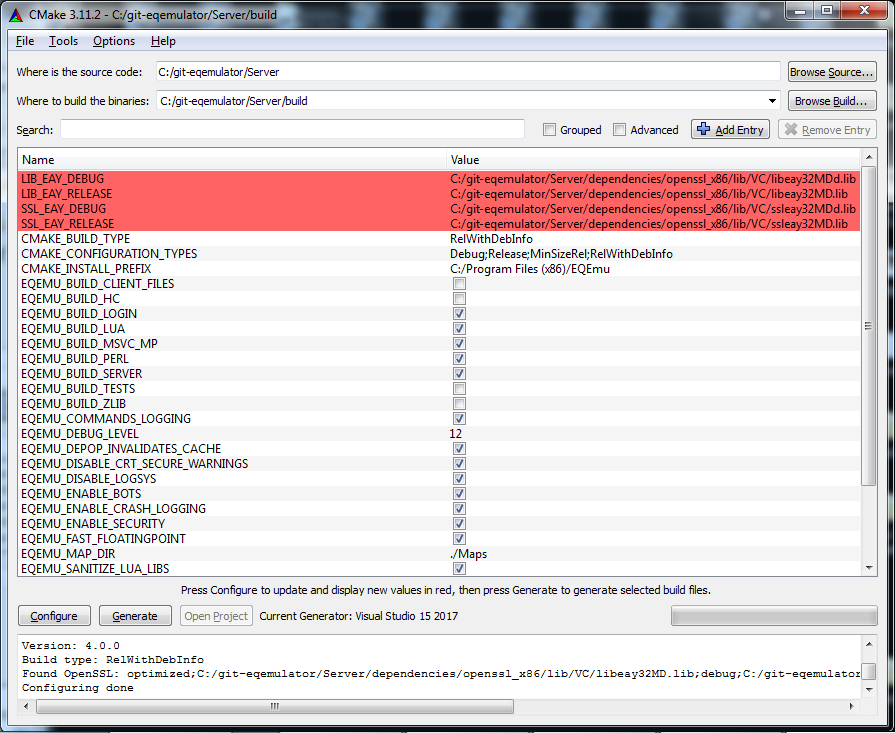
You should now have a list of unconfigured options (in red) displayed in the main window of CMake:
The following list contains the most common options of interest to the majority of users:
EQEMU_BUILD_CLIENT_FILES[enabled] Builds binaries used to import/export client support filesEQEMU_BUILD_LOGIN[disabled] Builds the login server (this guide makes use of the login server - change this option to enabled)EQEMU_BUILD_LUA[enabled] Compiles server code with Lua supportEQEMU_BUILD_PERL[enabled] Compiles server code with Perl supportEQEMU_DEBUG_LEVEL[5] Determines what additional messaging and debugging code is enabled/disabled (12 is max)EQEMU_ENABLE_BOTS[disabled] Compiles server code with Bot support (user choice)
Info
Ensure that you set EQEMU_BUILD_LOGIN to enabled
Once you have set the options that you would like for your server, click Configure again.
Since we set an option (login server) that requires additional settings, more unconfigured options have appeared. In this case, the open ssl library:
These new options are only file path definitions. No additional changes need to be made. Click Configure one last time.
Info
Regardless of option settings, anytime that you have red (unconfigured) entries in your options list, you will need to click Configure to ensure that the settings are applied to the current CMake file generation template.
You can now click the Generate button.
If file generation was successful, you should see "Generating done" at the bottom of the CMake window.
You are now ready to open Visual Studio and compile your code!
Compiling Code
To open the CMake-generated solution file:
- Navigate through the desktop
accountfolder shortcut toc:\<account>\Server\build - Right-click the
EQEmu.slnfile - Select
Open with>> (Microsoft Visual Studio 2017orMicrosoft Visual Studio 2019)
Upon loading, Intellisense will begin mapping out the entire project. Allow a few seconds for this process to finish. The lower left-hand corner will display "Ready" when this process has completed
Visual Studio does not honor CMake's CMAKE_BUILD_TYPE variable. You will need to manually set this to the desired build type before compiling your code.
There are 4 options:
Debug- not recommended for production servers unless conditions warrant its use (i.e., load testing, trouble-shooting, etc...)RelWithDebugInfo- standard compile for production servers (provides debug symbols without the added overhead of extra code, memory buffers and stl assertions)Release- similar toRelWithDebugInfo..but, without access to debug symbols (not recommended)MinSizeRel- Same asReleasewith the exception of trading off faster code for smaller size (not recommended)
Info
Debug is _preferred for a local test server_
To compile your server code, you have two choices:
- Use the menu path under the top menu (
Build>>Build) - Use the menu path by right-clicking under
Solution Explorer(Solution 'EQEmu'>>Build)
Info
Both paths result in the same action. Use whichever you are more comfortable with
The compiled code will be located in the c:\<account>\Server\build\bin\<build_type>folder.
Code Maintenance
- Working Tree Changes
- Master Branch Code Updates
- Dependencies and Submodules Updates
- Branches and Stashes
- Reverting Changes
- Resetting to Previous Commits
Acquiring Quests
-
Quests can be downloaded here: https://github.com/ProjectEQ/projecteqquests
-
Place these in your server folder.
Acquiring Database
- The PEQ database can be acquired here: http://db.projecteq.net/
Acquiring Assets/Maps
This section needs to be updated. The current method was deprecated (eqemu_server.pl)


